
In Fall 2020, I got a broken CRT monitor from my college's recycling heap and turned it into a helmet with a working RGB LED display. Here's some information about how I made it and how it works. If you want to make a TV head without the electronics, this method should still work if you ignore all the electronic parts. If you just want to see the finished costumes, skip to the gallery.
Non-electronics
I disassembled the CRT monitor, being careful to discharge the cathode to avoid a painful electric shock. (I think my monitor was self-discharging anyway, but it's better to be sure.) I put the big glass cathode ray tube away in a cardboard box so I wouldn't accidentally trip over it and make it implode, which would be unpleasant for multiple reasons. I cleaned out the inside of the monitor and shook out the dead ladybugs that had collected inside over the years. I used a dremel to cut a hole in the bottom of the monitor just big enough to fit my head through.
My first prototype used plexiglass for the screen, but I found that a thinner sheet of polycarbonate was much lighter on my neck and flexible enough to bend into a convex shape, which makes the helmet look more realistic. I tinted the polycarbonate using some privacy window film.
The most difficult and frustrating part of this project was getting the helmet to fit comfortably using upholstery foam. Other guides on the internet recommend using three blocks of foam cut into rectangles that you cram your head between, but that was unacceptable for me. I eventually figured out a good foam setup that leaves my ears uncovered, which is nice because it lets me hear and wear my glasses.
I hot glued everything together. I eventually added posable telescopic antennae extracted from an old TV antenna from a thrift store.
Electronics
The screen is made of 300 individually-addressable RGB LEDs, specifically WS2812Bs. I made the LED matrix from a single 5-meter, 60 LEDs/meter strip by cutting it into 15 strips of 20 pixels each and soldering them together. People often ask me how I can see through the helmet; the answer is that I designed the matrix to have empty space between the strips:


It's like wearing sunglasses and slotted shades at the same time, so visibility is pretty good in a well-lit area, but bad enough in the dark that I need someone to hold my hand while I walk down unlit streets on Halloween night.
A Circuit Playground Express microcontroller (similar to an Arduino) controls the lights using a program I wrote. A mini PS/2 keyboard connects to the microcontroller through an adapter, granting control of lights. Just a few buttons could suffice for playing animations, but I opted for a full keyboard to type words to appear on the screen. The microcontroller has a built-in accelerometer which I use for a few gravity-sensitive animations.
Here's a circuit diagram of the whole thing.

I no longer recommend this circuit design because I later simplified it for projects described below, from 6 to 3 components. The level shifter, in particular, is not necessary; the LEDs and keyboard both happily operate at 3.3V.
TV Head Mk. 2
In 2021, I collaborated with my friend Ellie to make them a TV head like mine, but better! The improvements were largely motivated by an added goal: Ellie wanted to display Chinese text on the screen. Chinese glyphs are more complicated than ASCII so we needed a resolution at least as big as mine despite the screen being smaller than mine.
The issue was that you can only make LED strips so dense before you need to make them wider, too. 60 LEDs/meter seems to be the densest you can go without sacrificing strip narrowness. We cleverly worked around this by laying the strips diagonally across the screen rather than laterally! This resulted in a tighter grid of 24x18 resolution. We also used extra-narrow LED strips, which gives Ellie more room to see between them, at the cost of more light reflecting back into their face instead of getting blocked by the margins of the strips.
This video shows the front panel detached, so you can see how the strips are arranged. Here's a photo of the back if you want to see the wiring.
The requirement of Chinese text also motivated a better input method. You can type Chinese on an English keyboard with a GUI, but it's harder without one. So, we used a Circuit Playground Bluefruit to control the helmet wirelessly from a phone, which is way easier than using a keyboard.
(For some reason, the Circuit Playground Bluefruit cannot control more than about 200 LEDs. I don't know if it's a hardware limitation or a fault with the FastLED library. We were running out of time to finish the helmet, so we fixed this by using two Circuit Playgrounds: a Circuit Playground Bluefruit to communicate with the phone, and a Circuit Playground Express to control the LEDs. It's a goofy bodge but it works; a better solution would be to use something like a Bluefruit LE UART Friend in place of the Circuit Playground Bluefruit. It basically takes the place of the PS/2 to UART converter in the circuit diagram.)
Respirator
In 2022, I was excited to wear my TV head to Halloween parties, but I had started wearing a half-face respirator mask out of caution for airborne pathogens, which does not fit inside my TV head. Because of this, I decided to combine the two by incorporating my TV head technology into a full-face respirator.
My favorite half-face respirator is the 3M 6200, so I ordered a 3M 6800, basically the full-face equivalent. As I had hoped, it fit me similarly well.
Tinting the respirator lens required many careful attempts at cutting the window film into just the right shapes. Turns out it's hard to apply it to an arbitrarily curved surface!
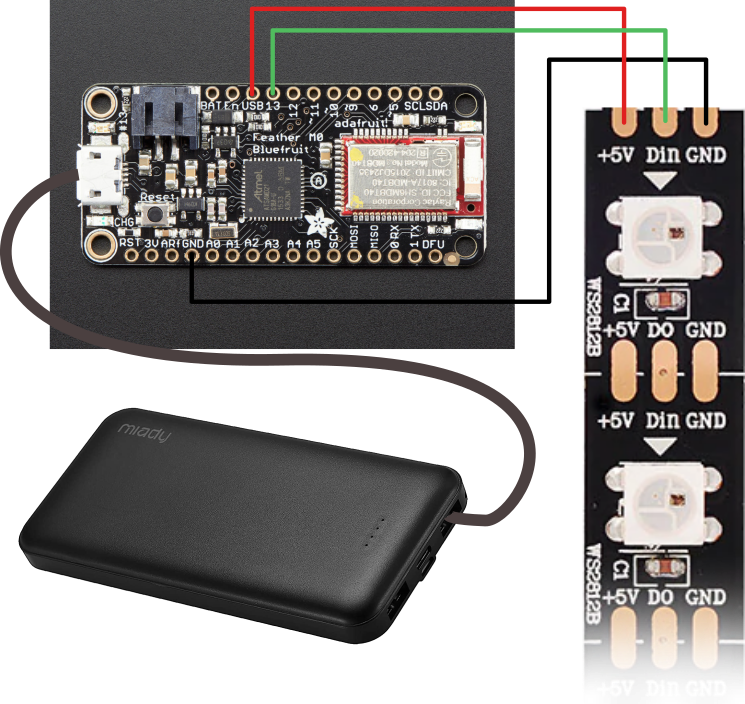
For the electronics, I used a different microcontroller, simplifying the circuit. I went with the Adafruit Feather M0 Bluefruit LE, an Arduino with a Bluetooth receiver. It basically works the same as the TV Head Mk. 2, but with one microcontroller instead of two. It lacks some of the Circuit Playground's fun sensors, like the gyroscope and microphone, but fits into a smaller footprint, complementing the limited space of the respirator.
This circuit ends up way simpler than my original design, so I recommend it if you're making a TV head or similar project!
The inside of the mask:

The finished look:

Advice
Here are some lessons I learned and tips to anyone who might want to try making one of these.
- Make sure you get LED strips with black PCB, so they aren't visible through the tint.
- You can buy clips to attach WS2812 strips to each other without soldering, but beware! They give an unreliable data pin connection, which can cause the matrix to glitch out and strobe.
- Of course, don't make your animations strobe on purpose either, or you might give someone a seizure.
- To conserve battery life and lower current requirements, try minimizing the amount of light your animations use. Program brightness adjustment commands, too.
- Don't get hot glue in your hair.
- WS2812B strips, and even the USB/PS2 keyboard I used, operate happily at 3.3V.
- Try to keep the helmet light so you don't strain your neck. Put the battery in the back to counterweight the screen.
- Cover logos on the monitor with something that gives it personality. In my case, the cute bow works well.
- Adafruit has nice guides, but don't buy the LED strips from them; you can get them way cheaper elsewhere. Aliexpress is probably the cheapest if you're willing to wait for long shipping times.
- If you'd rather use a Raspberry Pi Pico with MicroPython, check out DeVinci's writeup of their TV head, inspired by mine. I haven't seen such a nice technical explanation of TV head programming since I wrote this one!
- Many 3M 6800s have been outfitted with LED matrices since I made mine. Read about the visors of ⛧-440729 and Δ-44203. Hear also Building a Robot Visor: How and Why.
- I had never soldered before making my first TV head, but I learned how, and you probably can too!
If you're trying to make your own TV head, feel free to ask me for advice! Message me on Discord (my username is 9409, but I get a lot of spam friend requests, so just message me) or Mastodon, or email me at [my first name]@[this domain]. I get enough questions that I impose one rule: if you ask for help and have both no electronics experience and no coding experience, then please repay me by sharing one interesting or funny story.
If you don't need my advice, contact me anyway when you finish your TV head so you can show it to me!
Acknowledgements
Thanks to Franci Bolden for helping me with the dremel and bandsaw, and for insightful advice that I wouldn't have thought of! Also thanks to fuchsia and Izzy Swart for early hardware advice!
Gallery


Here's a promotional video of us made by Marietta College video producer Mary Roberts.
Check out this gallery of other works made using this writeup!